Understanding Your Body Through Felt Sensations
In this section, I will give you anatomy insights to better use your body. In the next one, I will give you prompts and improvisation techniques to explore.
I work best with images when learning movement. Not intellectual concepts about anatomy, but visual and sensory images that I can actually feel in my body. When someone tells me "engage your core," I don't really know what that means. But when they say "imagine your spine lengthening like a string is pulling the top of your head toward the sky," suddenly I have something I can work with.
So that's how I want to approach this section on anatomy and physicality. I'm not only going to give you textbook descriptions of body systems. Instead, I want to share images and felt sensations that have helped me gain more awareness of how my body works, which has allowed me to dance with more freedom and precision.
I'm drawing on the work of Odile Rouquet, Bonnie Bainbridge Cohen, Leslie Kaminoff, and Vanda Scaravelli. You can find references in the bibliography.
Insight 1: Bones Carry, Muscles Move
When I first started dancing, my instinct for creating stability was to tense up. Grip everything, hold tight, muscle my way into positions. But I actually had the basic mechanics backwards. The more I grip, the less stable and available I become.
Here's the shift that changed everything for me: bones are designed to carry weight, muscles are designed to create movement.
Think of your skeleton as structure. When the bones are stacked well - when they're aligned so that weight can flow through them efficiently - they can support tremendous force with almost no effort. Like how a stone arch can hold up a cathedral for centuries without any glue or reinforcement, just through the precise arrangement of the stones.
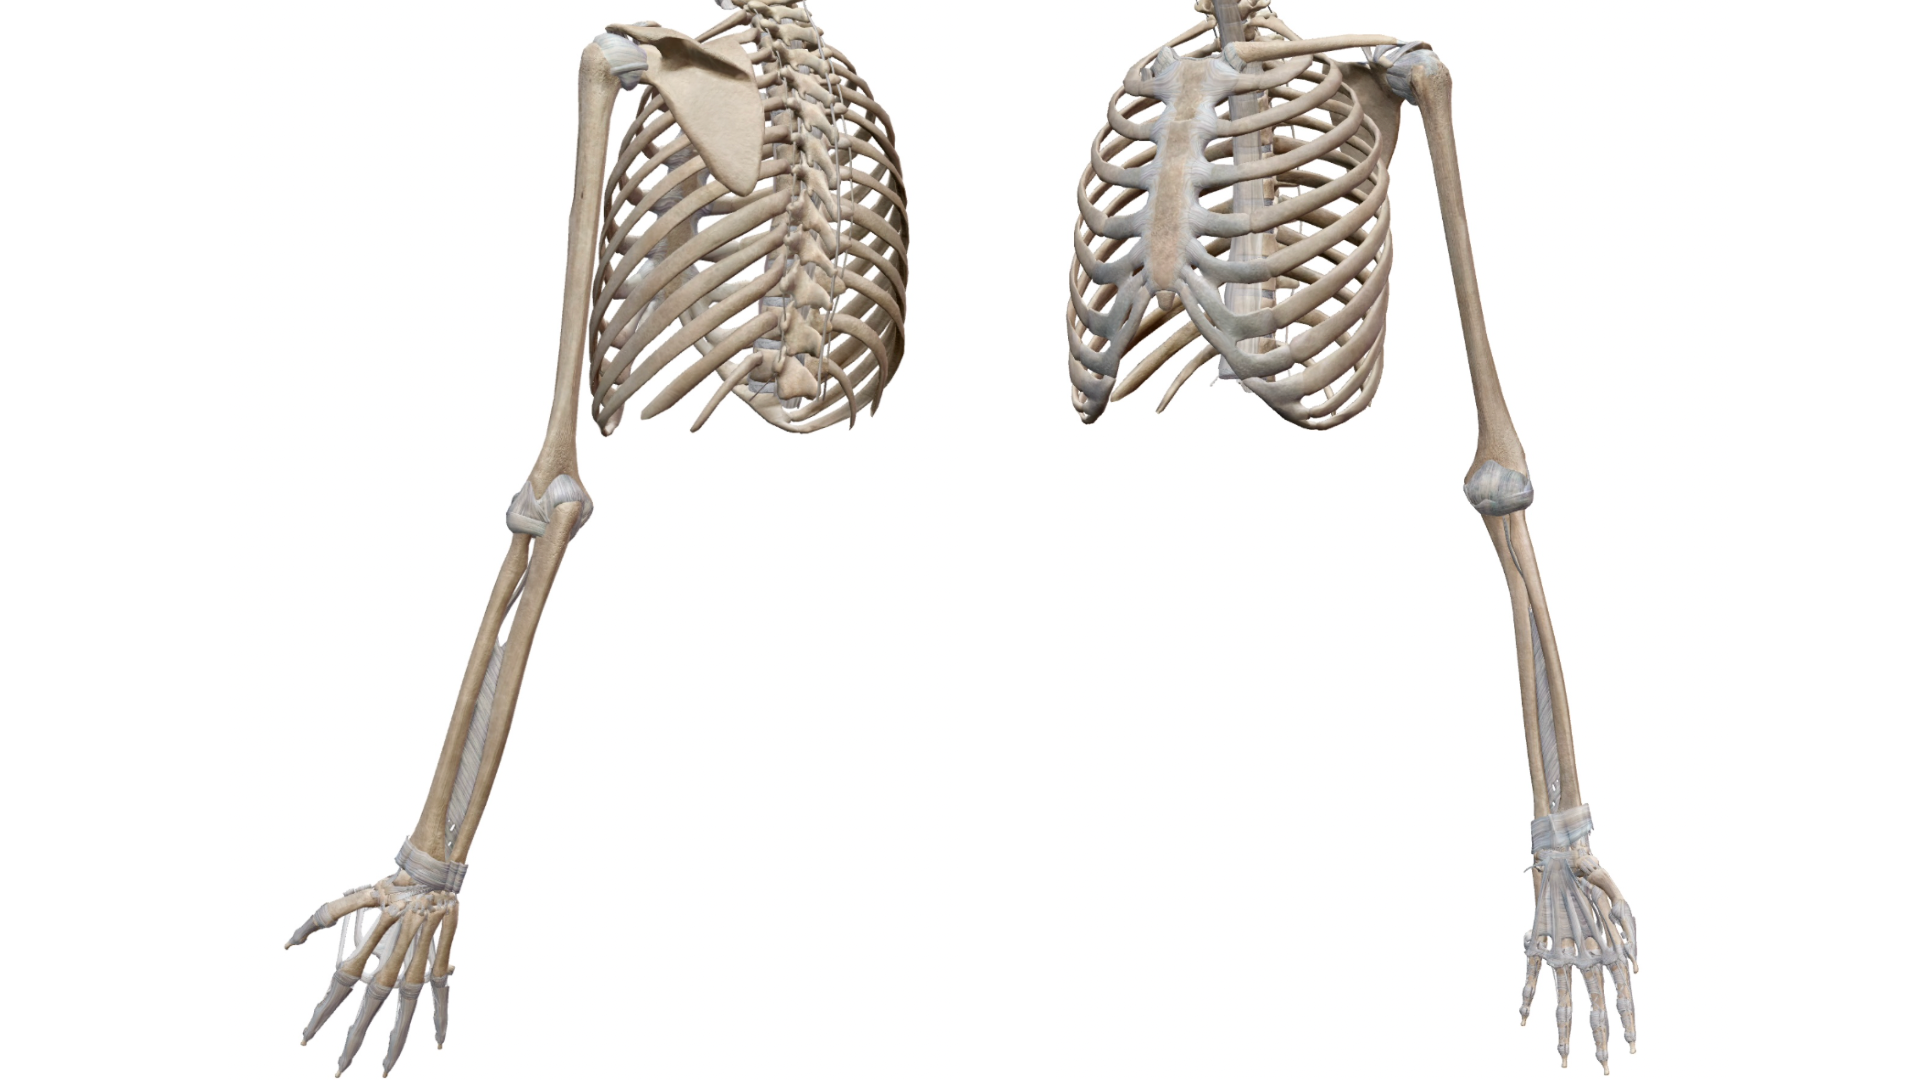
Bones transmit force. When you do a push-up, the force travels along a pathway through the bones: from the hands through the radius and ulna (forearm bones), to the humerus (upper arm bone), through the scapula (shoulder blade), along the clavicle (collarbone), into the sternum (breastbone), through the ribs, down the spine to the pelvis. The force follows the pathway of the bones like electricity through a circuit.
When someone pushes your shoulder while you're standing, that force travels down through the spine - vertebra by vertebra - into the pelvis, through the femur (thighbone), down the tibia and fibula (shin bones), through the foot bones, into the ground. When you jump and land, the impact force from the ground travels back up this pathway.
When bones are stacked efficiently, force flows through them smoothly. When they're misaligned, the force can't travel cleanly through the skeletal pathway, and muscles have to work overtime to compensate.
Muscles create movement. This is the crucial distinction: bones are designed to transmit force efficiently through compression. Muscles are designed to create movement by contracting and lengthening. When muscles have to do both jobs - when they're forced to hold you up AND move you - they can't do either job well. They become rigid, exhausted, and lose their capacity for fluid movement.
What Changed for Me
Muscles work best when they move bones into positions where the bones take on the weight-bearing function.
When standing, if the bones are properly stacked - femur bones sitting correctly in the hip sockets, pelvis balanced over the legs, spine rising with its natural curves intact - then leg muscles can stay relatively soft and available. The quadriceps don't have to work constantly, calves aren't gripping, hip flexors aren't tight. But if bones aren't aligned - pelvis tilted too far forward or back, knees locked or collapsed inward, spine compressed - then muscles work constantly just to keep you upright.
When muscles take on a weight-bearing function that should belong to bones, something fundamental breaks down. The muscle has to contract and hold. It becomes rigid. And a rigid muscle can't create fluid movement - it's already locked in one job (holding you up) so it can't do its real job (moving you).
The image that helps me: When I'm standing, I imagine my femur bones (thighbones) sitting in my hip sockets like heavy balls in deep cups. The weight of my upper body drops down through these bones into the earth. When I can feel this, my leg muscles can stay soft and available instead of gripping to hold me up.
Try this: Stand and notice how much you're tensing your leg muscles - your thighs, your calves, your feet. Now imagine your bones are doing all the work of supporting you. Let the weight of your pelvis drop down through your femurs, through your shin bones, through your feet, into the floor. Can your muscles soften even a little bit? Can you sense the architecture of your skeleton doing what it's designed to do?
When you let bones do the supporting, muscles become free to do the moving. This is what creates that quality of effortlessness in good dancers. They're not fighting themselves. They've let the structure handle the structure, so the movement can handle the movement.
Insight 2: Working With Gravity Instead of Against It
Gravity isn't the enemy in dance. Learning to work with it instead of against it has changed how I move.
I used to think of gravity as constantly pulling me down, something to fight against. I thought strength meant resisting gravity, that grace meant overcoming it. But the more I release into gravity, the more power I actually have.
When you truly accept gravity's pull downward through the bones, the body naturally organizes itself into a more efficient structure. Bones handle compression while muscles, fascia, and ligaments handle tension. When these forces are balanced, you get strength with minimal effort.
This principle shows up in martial arts. In Tai Chi, they talk about "rooting" - sinking energy down through legs into the earth. In Aikido, "extending ki" downward. In Capoeira, connecting deeply to the ground to generate explosive power. When you allow gravity to do its work through the skeletal system, you create a stable foundation that allows the muscular system to generate powerful, fluid movement.
Gravity doesn't just provide stability - it also provides energy. When you work with gravity instead of against it, you can use it to help power movements.
I can feel when gravity is flowing through my skeleton. It makes me feel rooted and light at the same time - deeply connected to the earth yet completely free to move. I've become somewhat obsessed with finding this feeling. This connection makes me incredibly stable and available for complexity.
When truly grounded, I can take risks with movement that would be impossible if I were just balanced on the surface. I can lean further, reach further, spiral deeper, because there's an unbreakable connection to the earth.
Images That Help Me Find This Feeling
- A tree with roots growing deep into the earth while branches reach freely toward the sky. The roots spreading wider and deeper with each exhale, while the trunk lengthens
- Gravity as a river flowing down through bones from head to feet, carrying away unnecessary tension
- The skeleton as a lightning rod, conducting earth's energy up through the body while channeling excess tension down into the ground
- Wearing a very heavy coat pulling down into the earth, while the inner body becomes lighter, like a balloon rising inside the weight
- The center of gravity two inches beneath the surface of the earth
- Opening bottles of water in the ankles to release tension and let force go through to the earth
Exploring Gravity Through Movement
Stand straight, legs hip-width apart. Begin shaking from the knees - small, fast plié-tendu movements, like gently bouncing on a trampoline. Use minimal effort and focus on the middle point in the lumbar spine - the center of gravity, where the body naturally wants to pivot and balance.
Feel the lower lumbar spine going down toward the earth while the upper spine reaches toward the sky. Don't force this - just hold both intentions simultaneously and let the body find the balance. Odile Rouquet calls this the "two directions" of the spine.
Integrate arms on top of this shake, letting them move freely while maintaining the rooting quality in the legs. Arms should feel light and available, supported by the grounding below. Keep shaking until you feel deeply rooted. Feel like the center of gravity extends below the floor. Feel like roots are growing from feet into the earth, spreading wide and deep.
Then start improvising freely, but every time you step or make a movement, release into the ground. Like emptying a water bottle through ankles and heels - let gravity drain through you into the earth with each step, each gesture, each shift of weight.
Notice how this rooting quality affects movement. Can you move more powerfully when deeply connected to the ground? Does the upper body feel freer when the lower body is truly grounded? Do you have access to different qualities when working with gravity instead of against it?
Insight 3: The Spine - Your Central Intelligence
The spine was the first structure formed when we were developing in the womb. Everything else - arms, legs, ribs, skull - developed from and around the spinal column. At the most fundamental level, all movement originates from the spine. The spine is really the central pillar of human movement.

The Spine Isn't One Solid Piece
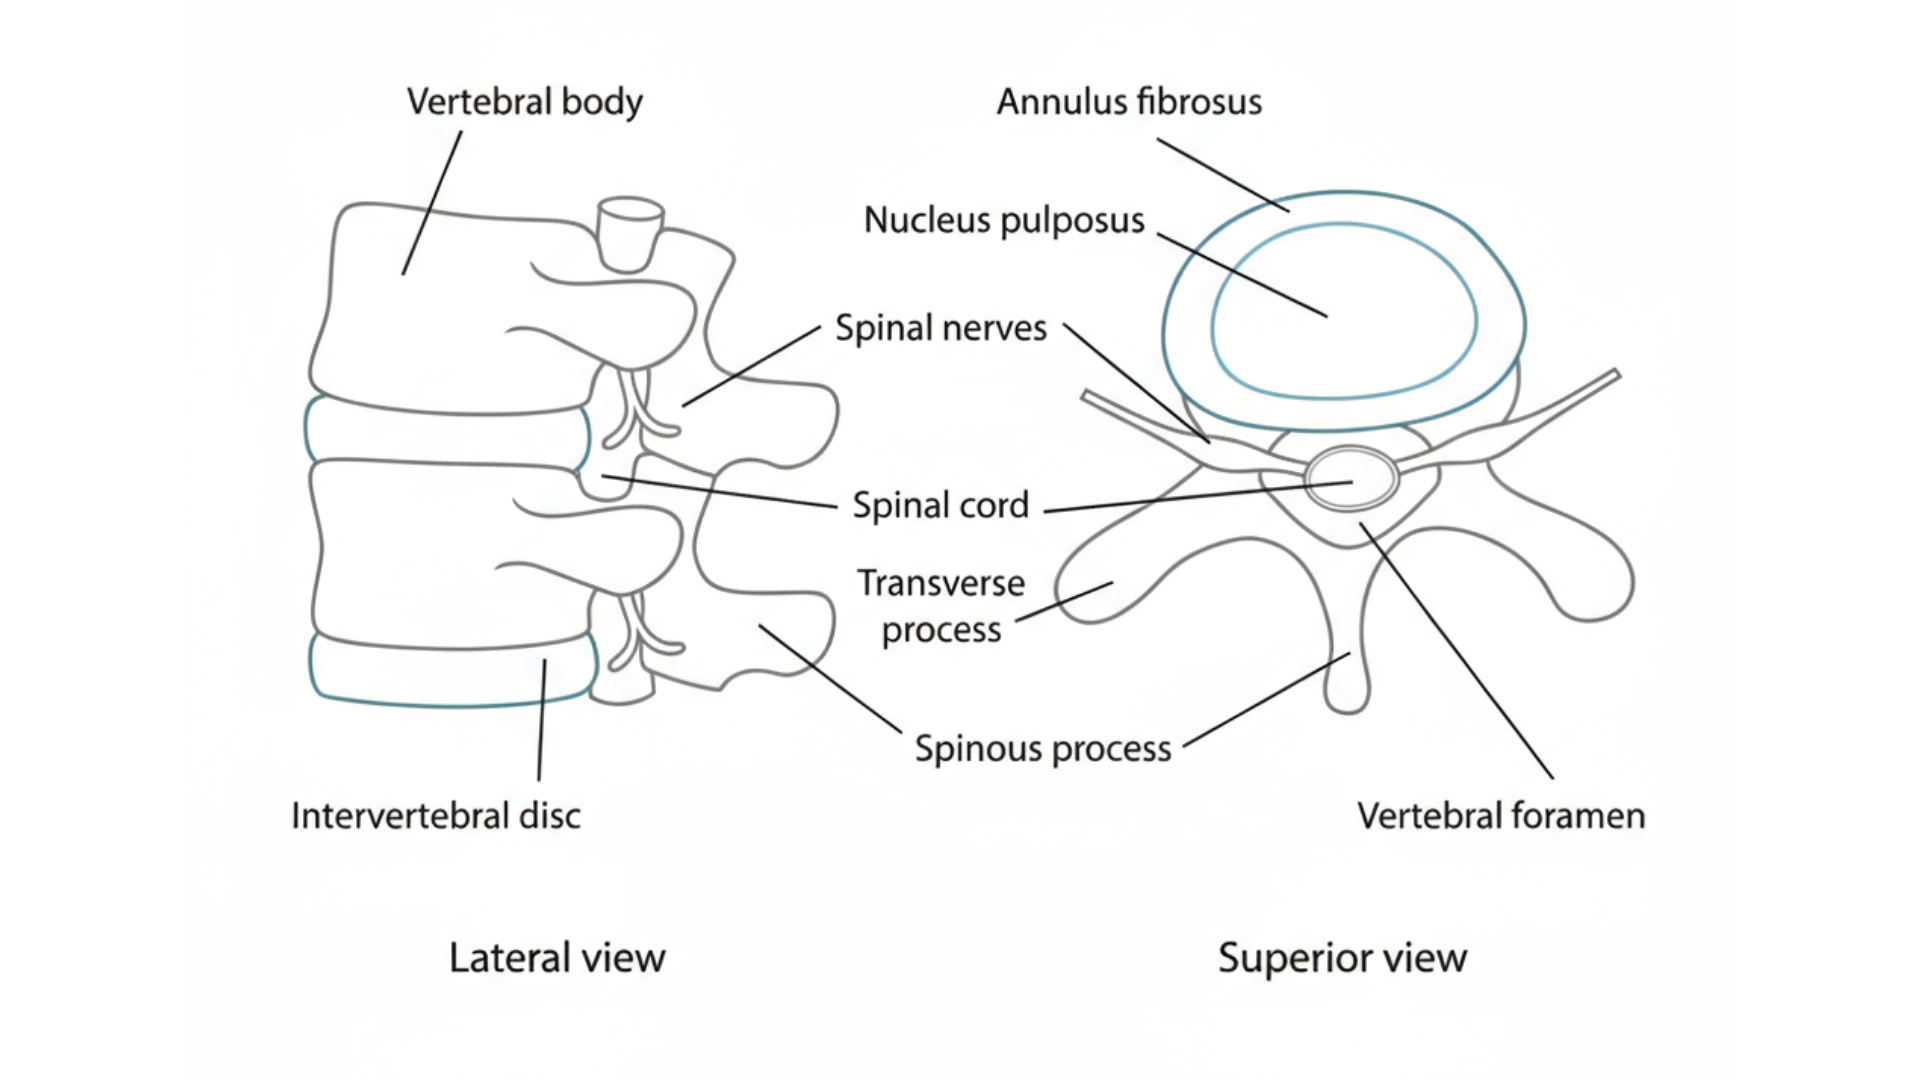
The spine is made up of 24 individual vertebrae (not counting the sacrum and coccyx), each capable of small movements. When these individual movements coordinate, they create curves and spirals. Most people move their spine like it's a rigid stick.
Each vertebra can move a little bit on its own. Between each vertebra is a disc - a gel-like cushion that allows movement while absorbing shock. The system is designed for both stability and mobility.
When you realize you have 24 individual joints in the spine, you can access incredibly sophisticated movement. You can initiate from one vertebra and let that movement ripple through the entire spine. You can create waves that travel up or down. You can isolate movement to one section while keeping another section still.
The image that helps me: I think of my spine as a string of pearls, or like a bike chain where each link can move independently while also affecting all the others. When I move, I'm not moving "my back" - I'm initiating a wave that travels through each individual vertebra.
Instead of thinking "bend forward," think "let the spine curve vertebra by vertebra, starting from the head and rolling down through each joint." Instead of "stand up straight," think "let each vertebra find its optimal relationship to the ones above and below." This creates movement that looks organic rather than mechanical.
Try this: Stand and slowly round your spine forward, as if you're rolling down toward the floor. But instead of just dropping forward from your waist, imagine you're curling one vertebra at a time, starting from the top of your neck. Let your head drop first, then the next vertebra releases, then the next, like a wave traveling down your spine. Notice how this feels different from just bending forward.
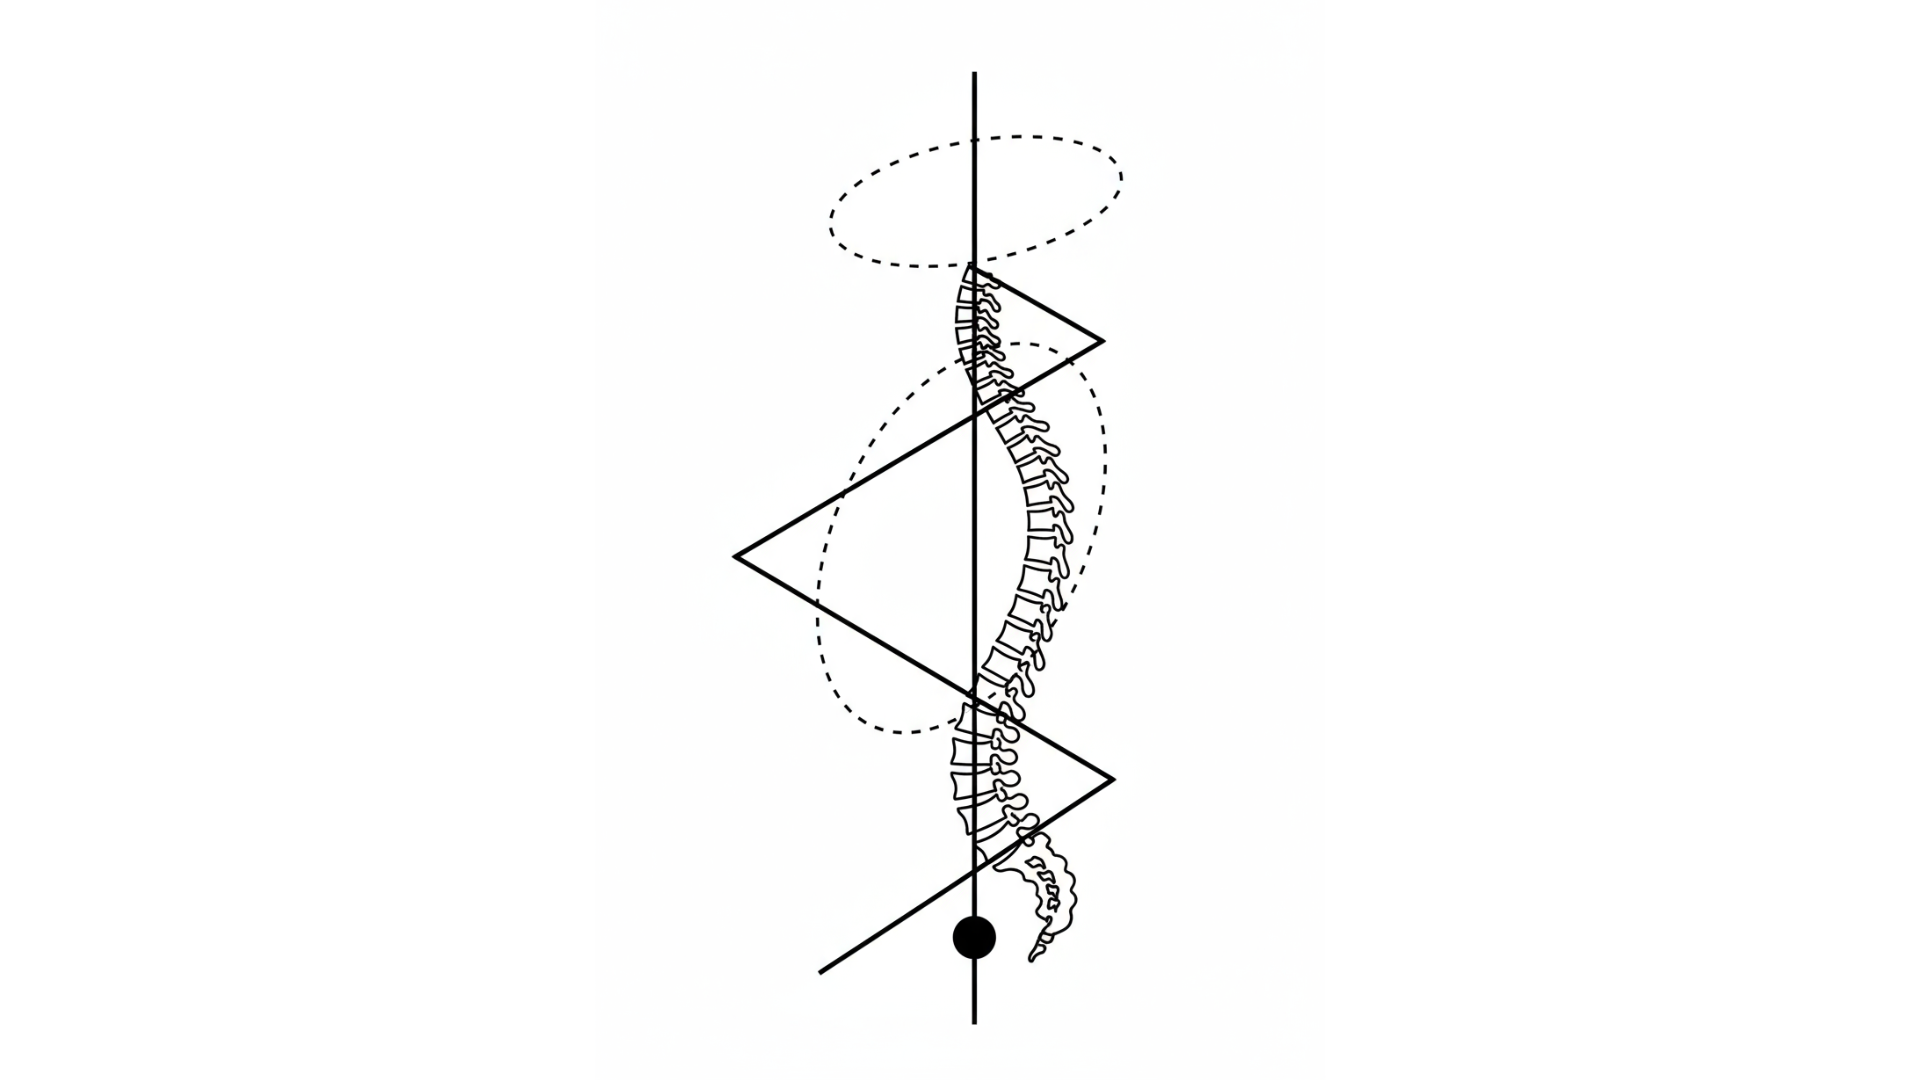
The Spine Has Two Directions Simultaneously
From about the level of the 5th lumbar vertebra (roughly where you can feel the back of the waist), the spine divides energetically. Below this point, it wants to go down - through the sacrum, into the legs, toward the earth. Above this point, it wants to go up - through the thoracic and cervical vertebrae, through the top of the head, toward the sky.
This isn't just poetic - it's based on how the spine is actually constructed. The lumbar spine (five vertebrae in the lower back) has thick, heavy vertebral bodies designed to bear the weight of the entire upper body. The curve of the lumbar spine transmits weight efficiently down through the pelvis and into the legs. This part is built for stability and weight-bearing.
The thoracic spine (twelve vertebrae in the upper back) is designed differently. The vertebral bodies are smaller, and each vertebra connects to a pair of ribs. This creates a more mobile structure that can rotate, side-bend, and flex with much more freedom. The cervical spine (seven vertebrae of the neck) is even more mobile, designed to allow the head to move in all directions while maintaining its relationship to the body.
There are also these deep muscles called the psoas muscles that originate from the front surfaces of the lumbar vertebrae and insert into the femur bones (thighbones). This means the legs, functionally speaking, actually begin in the middle of the spine, not at the hip joints. When these muscles work properly, they create a sense of lift through the spine while providing a clear connection between torso and legs.
When I can sense and work with these two directions, I tap into something really powerful. The downward direction creates stability and grounding. The upward direction creates lift and freedom. Together, they create a dynamic balance that makes complex movement possible with minimal effort.
Try this: Stand and imagine the tailbone dropping toward the earth while the top of the head reaches toward the sky. Don't force it - just hold both intentions simultaneously. Notice how this creates length and space in the spine without creating tension. The spine feels gently stretched from both ends, creating space between vertebrae.
In dance, this two-directional quality gives power to move in any direction. When reaching forward, the reaching comes from the upward direction while stability comes from the downward direction. When spiraling, both directions spiral together, creating movement that's both grounded and free.
Spinal Curves Are Engineering
The spine has four natural curves: the cervical curve (neck), thoracic curve (upper back), lumbar curve (lower back), and sacral curve (pelvis). These curves are the engineering that allows the spine to absorb shock and distribute weight efficiently.
The curves work together like a spring. When you walk, run, or jump, these curves compress slightly to absorb impact, then return to their natural shape. If the spine were perfectly straight, every step would send shock waves directly through vertebrae to the brain. The curves convert potentially damaging vertical forces into manageable spiraling forces that can be absorbed and distributed.
Each curve has a specific function. The cervical curve positions the head over the body for optimal balance and minimal muscular effort. The thoracic curve accommodates the ribcage and heart, creating space for breathing and circulation. The lumbar curve positions the center of gravity over the pelvis for efficient weight-bearing. The sacral curve connects the spine to the pelvis and legs.
Many people try to "fix" their spinal curves, thinking a straighter spine would be better. But the curves are essential. The goal isn't to eliminate them, but to allow them to be responsive - neither exaggerated nor flattened, but alive and adaptable to whatever movement you're making.
Exploring Spinal Articulation
Stand about a foot away from a wall, facing away from it. Your back isn't touching the wall yet - you have space. Knees slightly bent.
Start from the top. Begin to curl backward, starting with the very top of your head reaching back toward the wall. Let the top of your head touch the wall first, then continue curling - the next vertebra in your neck touches, then the next. Really slow - one vertebra at a time.
As soon as your cervical vertebrae (neck) start touching the wall, your head peels away from the wall and reaches forward - like someone is pulling your head forward. Continue down through your neck vertebrae, then into your upper back (thoracic spine), middle back, lower back (lumbar spine), until you reach your sacrum and coccyx at the very bottom. Each vertebra makes contact with the wall in sequence as you articulate your spine backward, while your head keeps reaching forward.
Now reverse it. Start away from the wall again. Begin to curl backward from the bottom - your coccyx reaches back and touches the wall first, then your sacrum. Then continue - each lumbar vertebra touches the wall. As soon as your middle spine (thoracic vertebrae) starts touching the wall, your coccyx peels away from the wall and reaches forward. Continue up - each thoracic vertebra touches, then each cervical vertebra in your neck, until you reach the top of your head. You're articulating your spine backward from bottom to top, just like you did from top to bottom.
This should take time. Really feel each individual vertebra. When you rush, you move the spine as one block. When you slow down and attend to each vertebra, you discover you have 24 individual joints that can each contribute their own small movement.
Insight 4: The Feet - Your Intelligent Foundation
The feet are way more sophisticated than I used to give them credit for. Each foot has 26 bones, 33 joints, and over 100 muscles, tendons, and ligaments. But most of us have basically turned them off - we wear shoes that immobilize them, walk on flat surfaces, and treat them like platforms instead of sensitive instruments.
The sole of the foot has three main points of contact with the ground - three points that form a tripod:
- The ball of the foot (where the big toe connects)
- The ball of the foot on the outer edge (where the little toe connects)
- The center of the heel
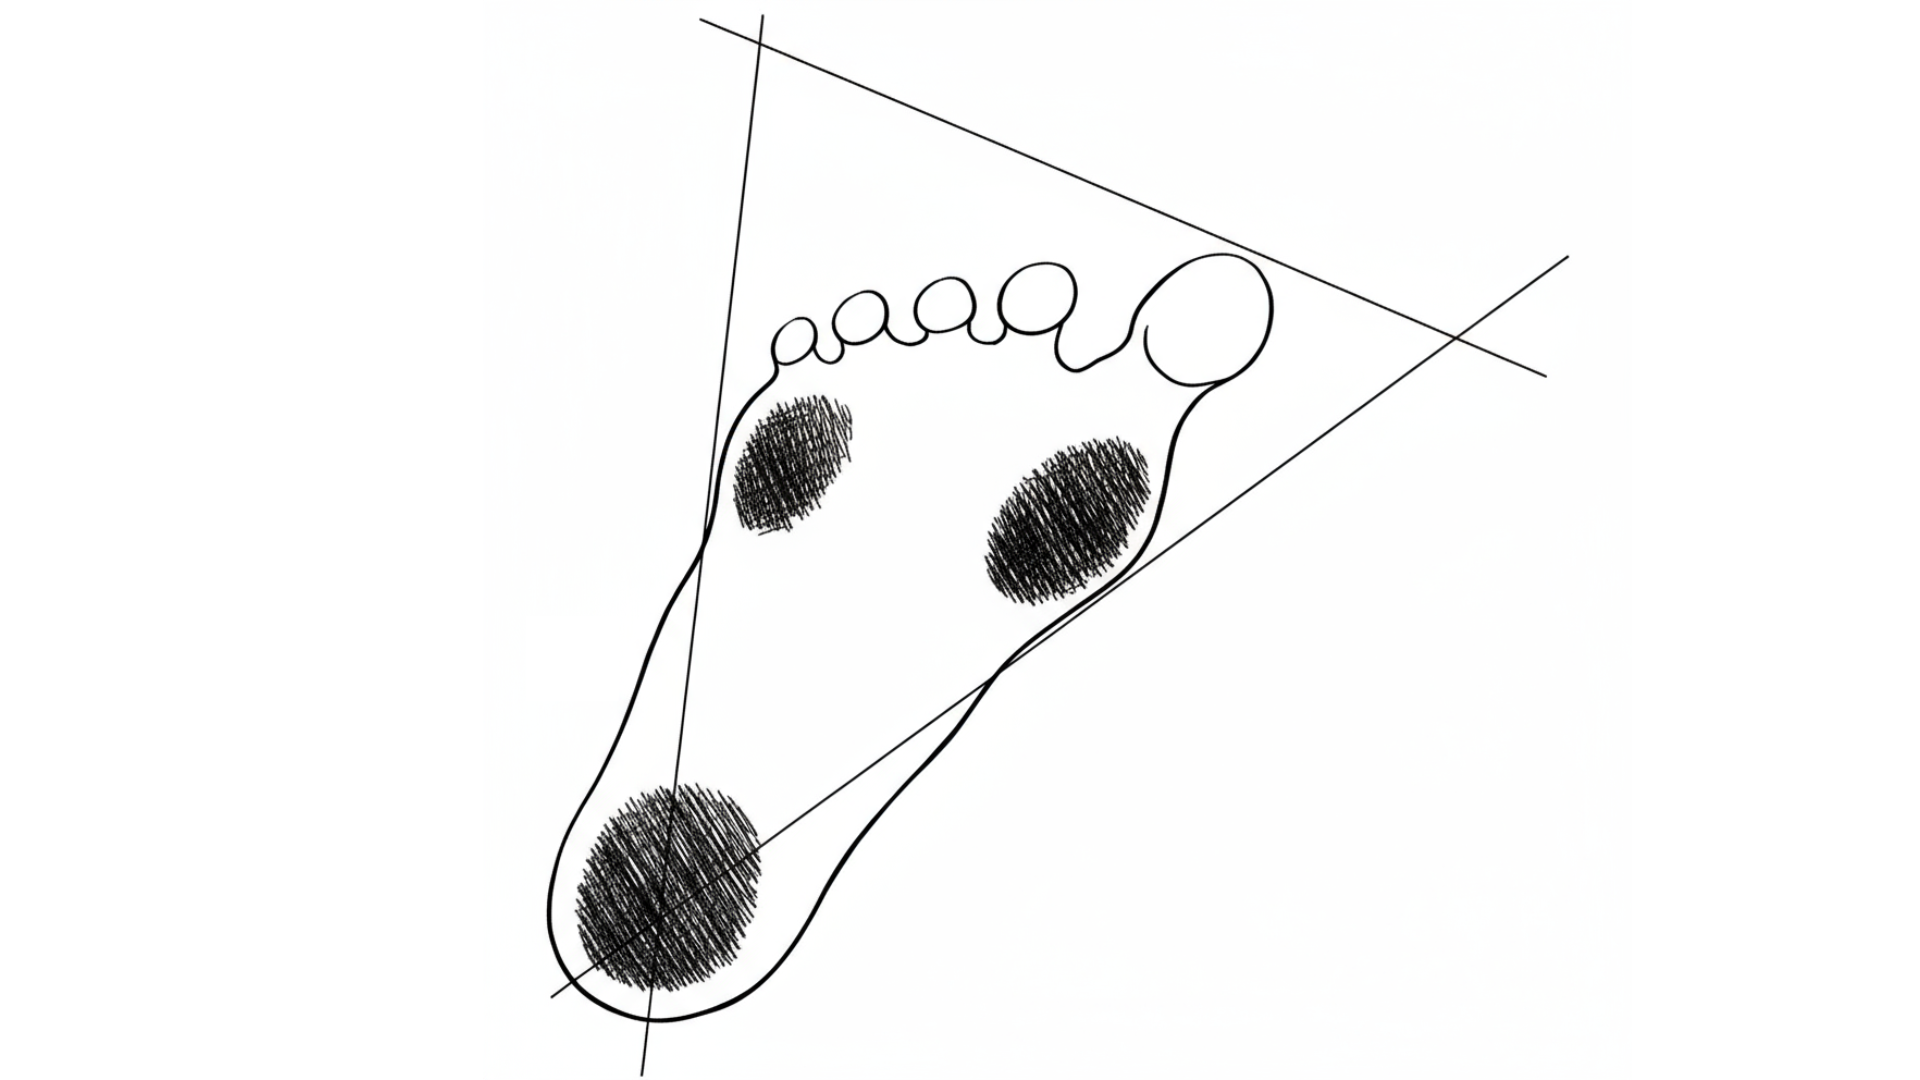
When weight is distributed across these three points, the foot has a stable base that can adapt to changes in weight and direction. Most people put too much weight on their heels or collapse the arch, losing the tripod structure.
The image that helps me: I imagine three points on each foot pressing into the ground like the legs of a tripod. Not forcing, just allowing the ground to meet me at these three points. When I can feel all three points clearly, my whole body organizes differently - my pelvis settles, my spine lengthens, my shoulders release.
Exploring Foot Sensitivity
Take your shoes off. Stand and bring your attention to your feet. Can you find the three points of the tripod - ball of foot on big toe side, ball of foot on little toe side, center of heel? Can you distribute your weight evenly across these three points?
Walk around slowly, paying attention to how your feet contact the ground. Can you feel the heel striking first, then the weight rolling through the foot to push off from the ball of the foot?
Try moving - reaching, bending, turning - while maintaining awareness of the feet. Notice how the feet respond to every movement you make. They're not passive - they're actively participating in organizing your balance and supporting your movement.
The more sensitive your feet become, the more stable and mobile you are. When feet are truly alive and responsive, they become a source of creativity and power.
Insight 5: The Pelvis and Legs
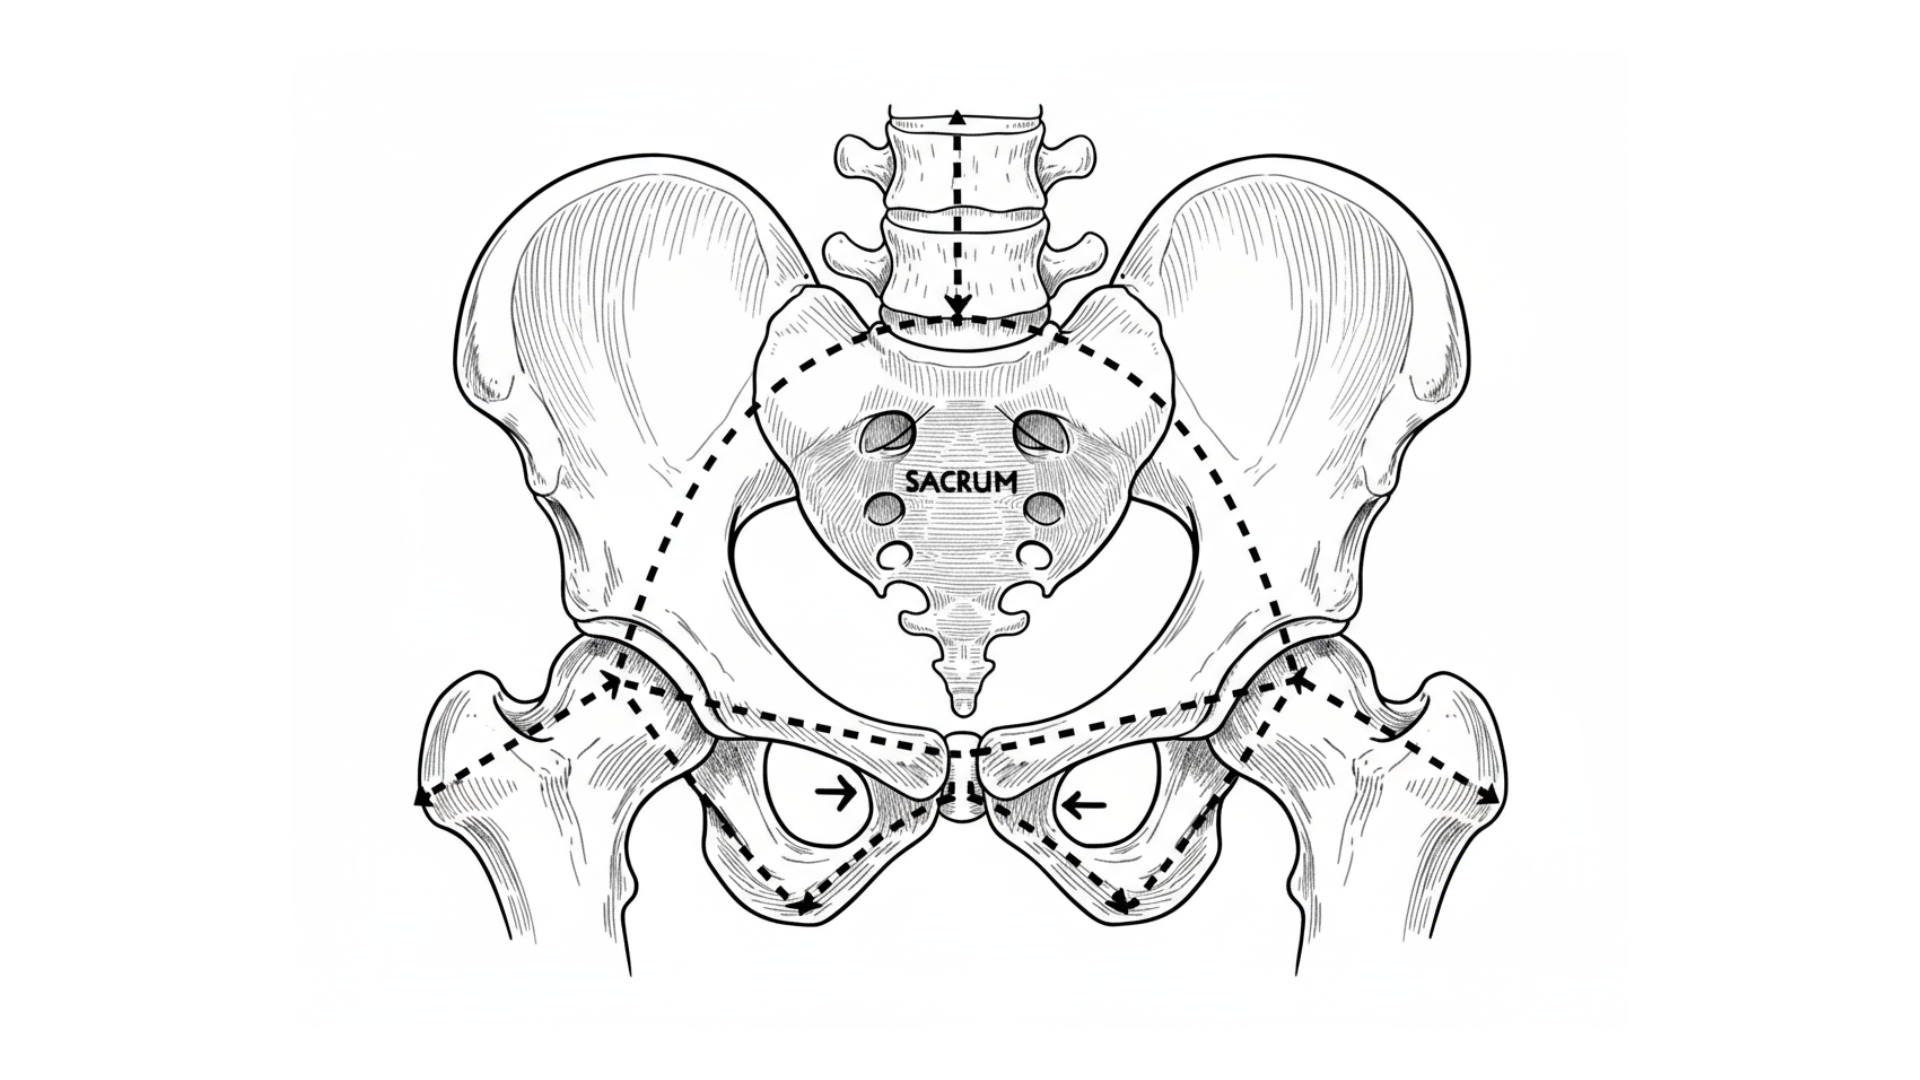
The pelvis is where forces coming up from the ground meet the forces of the upper body, and where all of that gets organized into coordinated movement.
The pelvis is made up of multiple bones that form a bowl-like structure. There are two hip bones, the sacrum (five fused vertebrae), and the coccyx (tailbone). These bones form a ring that houses some of the most important organs and serves as the attachment point for many of the largest muscles.
The Hip Sockets and Femur Heads
Your hip joints are where your legs actually connect to your pelvis. The round head of each femur (thighbone) sits deep in a socket in the pelvis called the acetabulum. This is a ball-and-socket joint - similar to your shoulder, but much deeper and more stable.
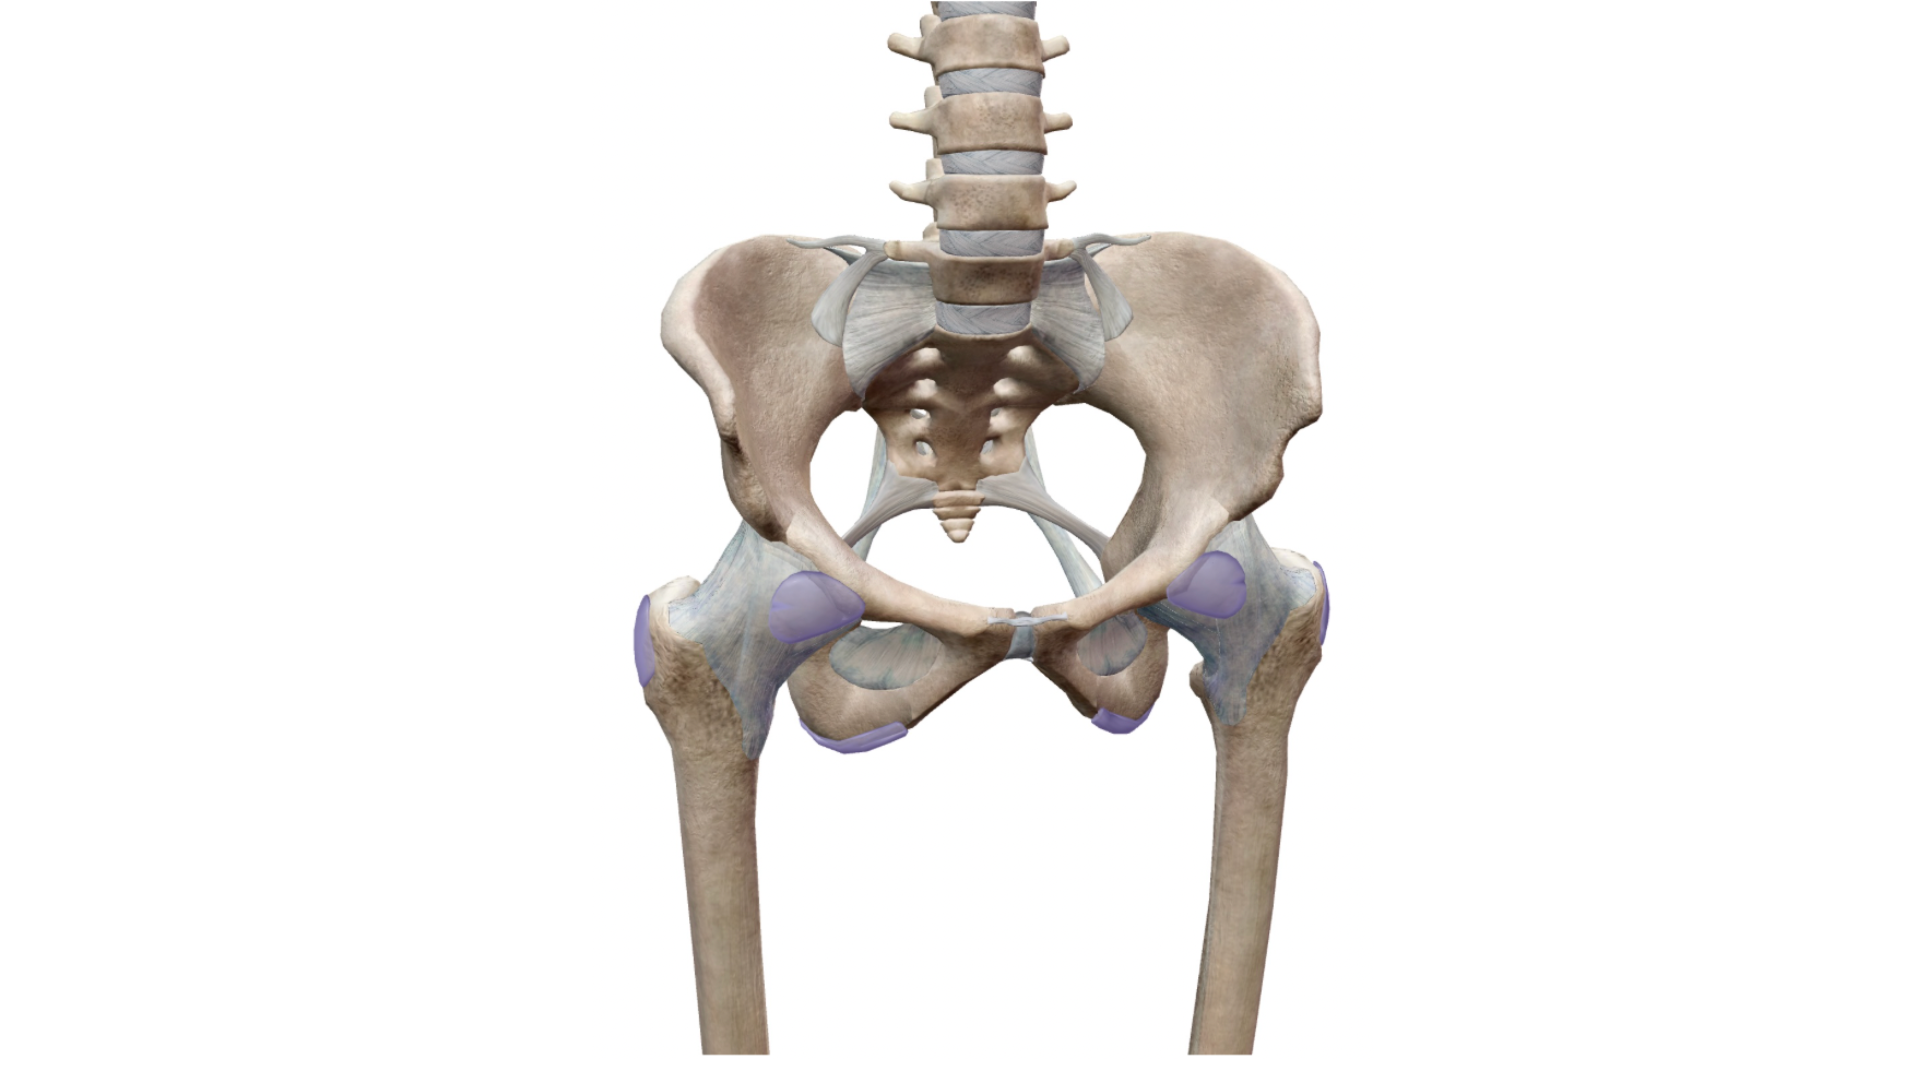
The image that helps me: I imagine these femur heads as heavy balls sitting in deep cups.
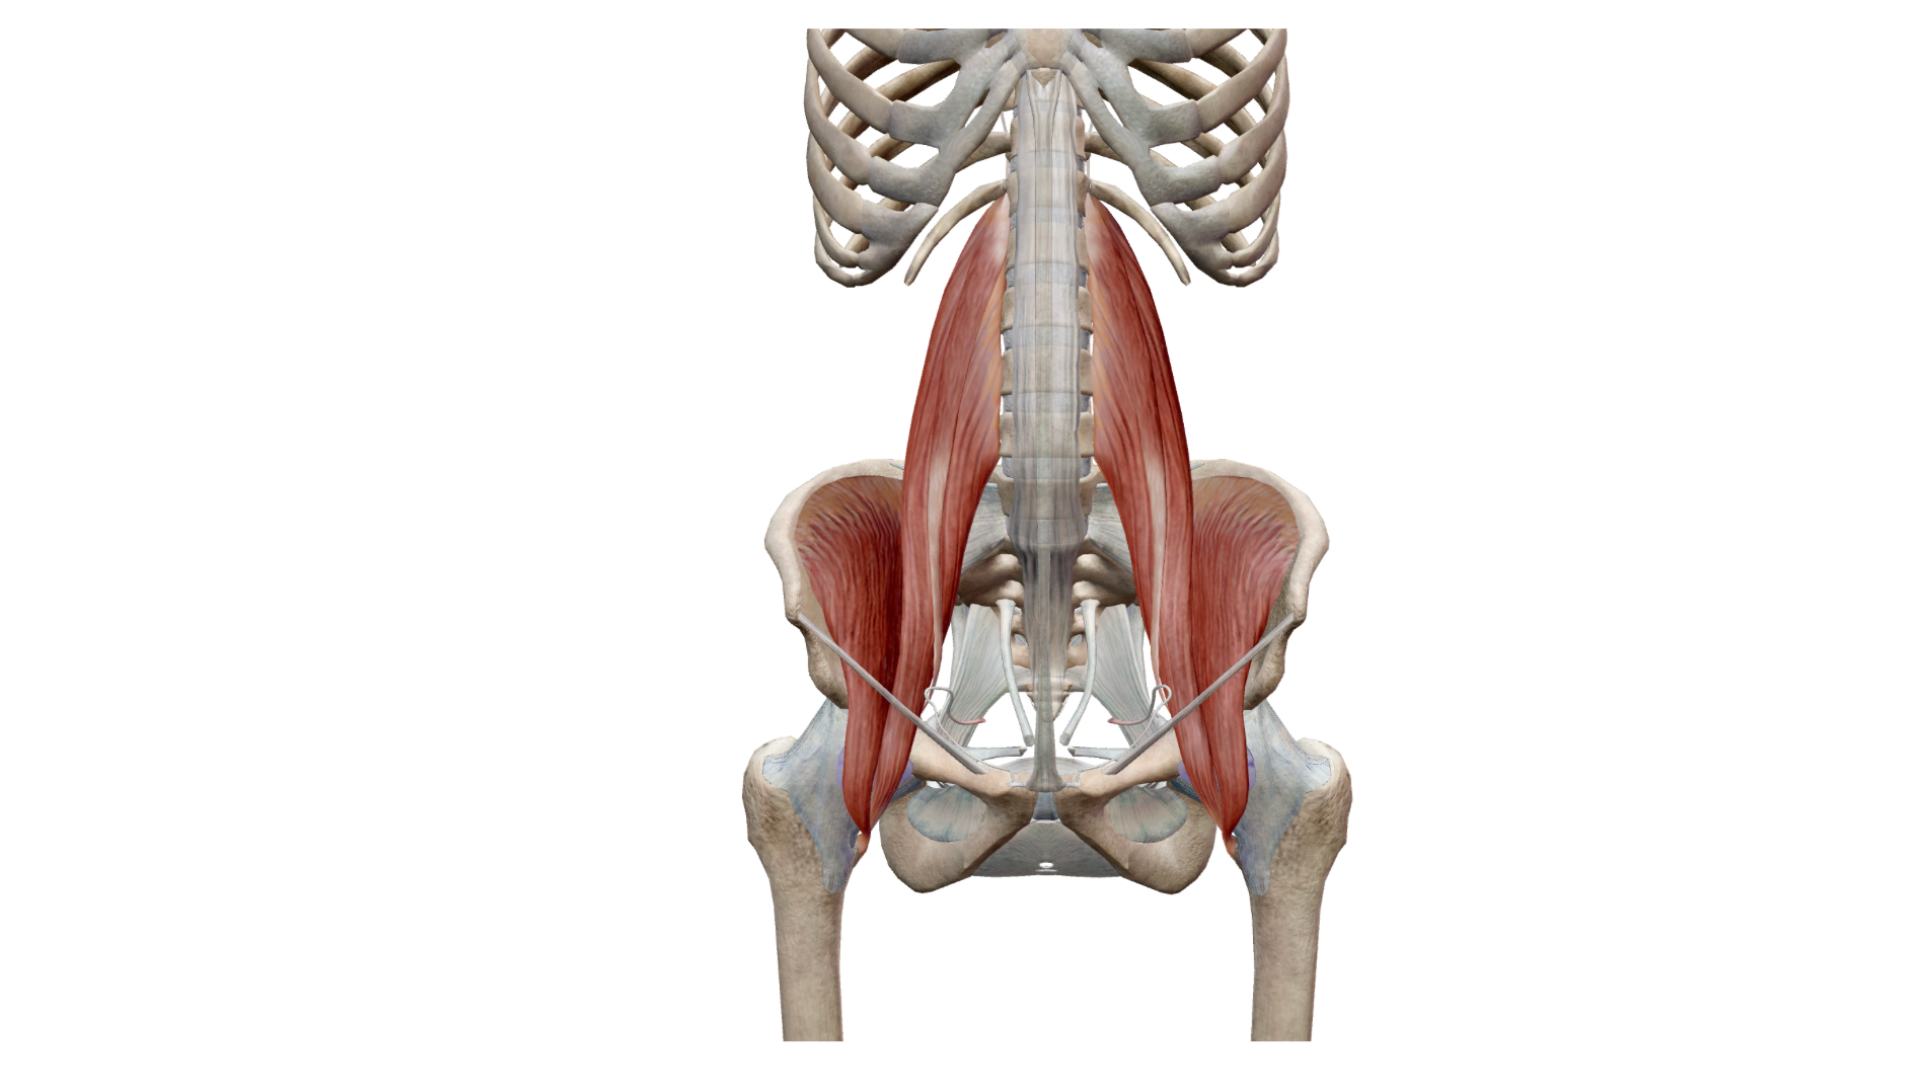
The Psoas - Your Deep Connection
There are these deep muscles called the psoas muscles that help explain why the legs feel like they begin so high. The psoas originates from the front surfaces of your lumbar vertebrae (the five bones in your lower back) and travels down through your pelvis to insert into the top of your femur, right at the inside of the hip joint.
This means your legs, functionally speaking, actually begin in the middle of your spine. The psoas is like a deep suspension cable that connects your spine to your legs. When it works well, it creates a sense of lift through the spine while providing a clear, powerful connection between your torso and legs.
The image that helps me: I imagine the psoas as cables running from deep in my lumbar spine down to the top of my thighbones. When these cables are working efficiently - neither too tight nor too loose - I feel both grounded through my legs and lifted through my spine at the same time.
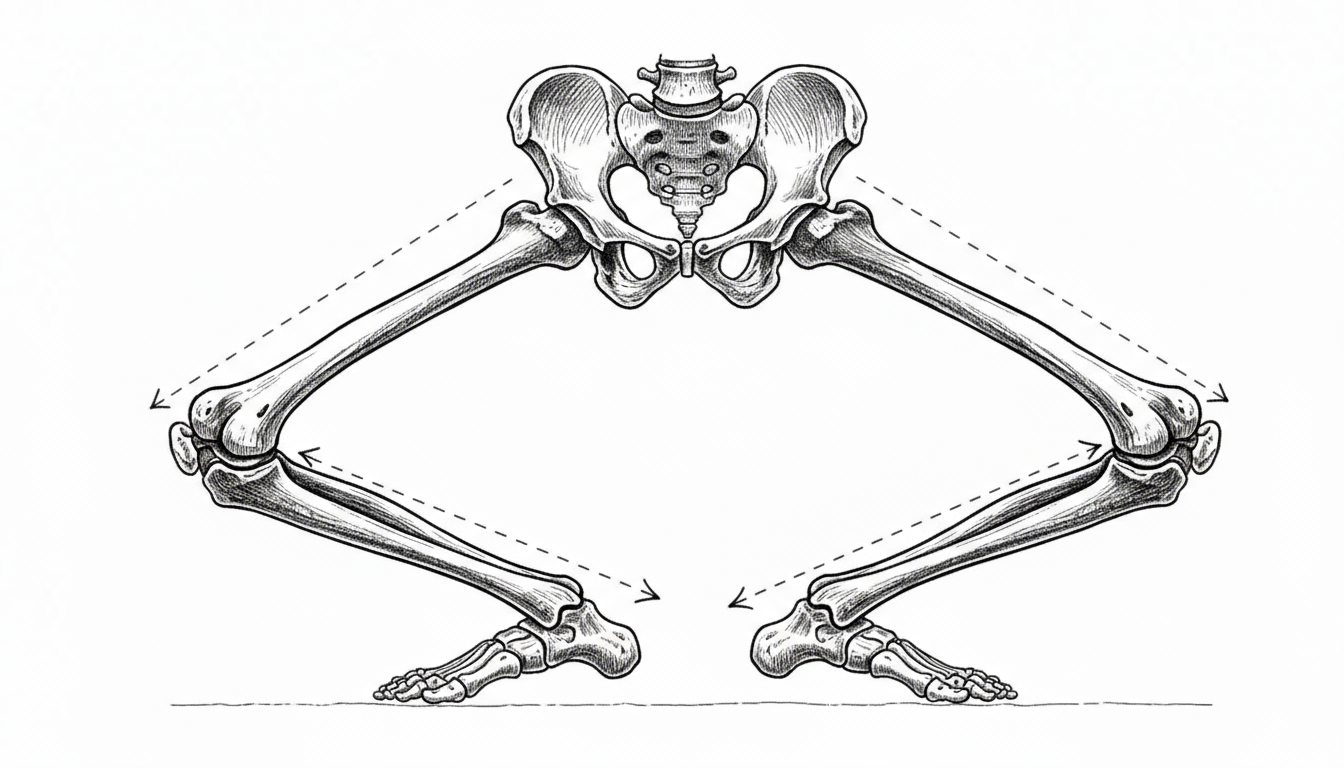
The Pelvis as a Bowl
From a movement perspective, you can think of the pelvis as having two architectural arches. Just like any architectural arch, these structures are strong when forces are balanced, but they become unstable when forces are uneven. This is why the position and organization of the pelvis affects everything else in the body. When the pelvis is balanced, it can serve as a stable base for the spine and a clear connection point for the legs. When it's out of balance, everything else has to compensate.
You can't create this balance by forcing the pelvis into the "correct" position. The balance emerges when you develop awareness of the internal volume of the pelvis and learn to sense its relationship to gravity.
Another image that helps me: I imagine my pelvis as a bowl that can tip forward, back, or side to side. When the bowl is balanced - not spilling forward or back - my spine can rise easily from it, my femur heads can sit naturally in their sockets, and my legs can move freely beneath it.
The pelvis needs to be both stable and mobile. Many people make their pelvis too rigid in an attempt to create stability. Others let it be too mobile and lose the sense of center that good movement requires. The balance point is what the Japanese call "hara" - a quality of centeredness that's both strong and responsive.
Sensing Pelvic Space
Lie down in constructive rest position - on your back with knees bent and feet flat on the floor, about hip-width apart. This position allows the pelvis to settle into a neutral position without having to work against gravity.
Take a moment to sense the internal space of the pelvis. Can you imagine the bowl-like cavity that contains organs? This isn't about seeing it perfectly - it's about developing a felt sense of the three-dimensional volume inside the pelvic ring.
Can you also sense where your hip sockets are? They're deeper than you think - imagine those femur heads sitting in their sockets, the weight of your legs releasing into the support of the pelvis.
Breathe gently and imagine breath filling this pelvic space. Not forcing anything, just bringing awareness to this three-dimensional volume inside the body. Notice how the pelvic floor (muscles at the bottom of the pelvis) gently expands and contracts with breath.
Insight 6: Arms and the Shoulder Girdle
Arms are designed to be incredibly mobile. Shoulder joints sacrifice some stability for a much greater range of motion than any other joint in the body. This engineering allows you to reach in all directions, create complex gestures.
But here's what I've learned: arms can only be truly free when the torso is properly organized. Arms don't move in isolation - they move as part of an integrated system that includes ribcage, spine, and pelvis.
The image that helps me: Instead of thinking "I'm moving my arms," I think "movement is traveling from my spine, through my shoulder blades, and out through my arms." The gesture originates from my center and flows outward.
The ribcage houses heart and lungs, and it needs to be both stable enough to protect these vital organs and mobile enough to allow for full breathing and dynamic arm movement. When the ribcage is balanced on top of the pelvis and supported by a well-organized spine, arms can move with incredible freedom and power. When the ribcage is displaced - collapsed forward, lifted too high, twisted to one side - the shoulder girdle can't work efficiently.
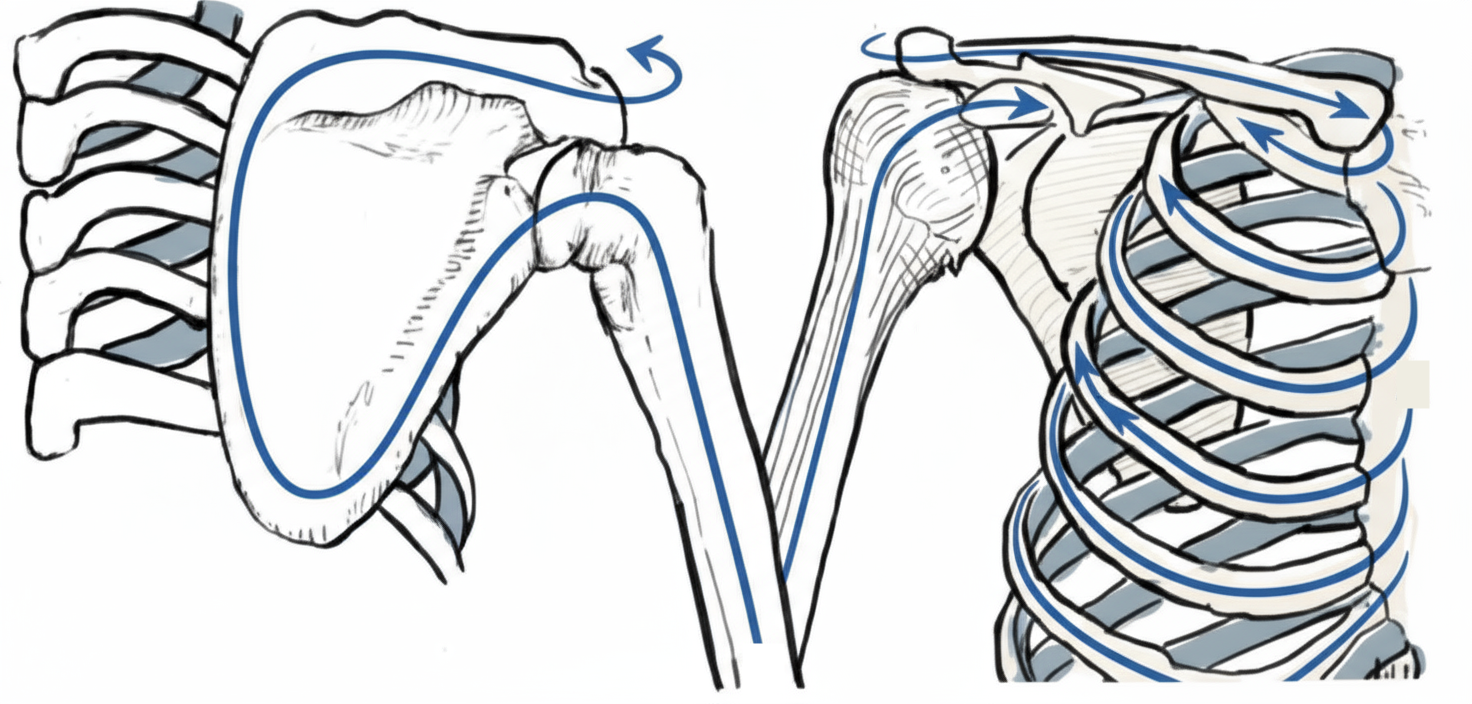
The shoulder girdle is a complex system that includes clavicles (collar bones), scapulae (shoulder blades), and the head of the humerus (upper arm bone) where it sits in the shoulder socket. Unlike the pelvis, which is a closed ring of bones, the shoulder girdle is an open system that depends entirely on muscular organization for its stability.

Your shoulder blades need to be able to glide freely over the ribcage, like hands sliding over a balloon. When they can move freely, they can support and enhance arm movement. When they're stuck or rigid, every arm movement becomes effortful.
Freeing the Arms
Start by lying on your back with arms by your sides. Feel the weight of arms settling into the floor. Notice how arms are connected to the ribcage, how the ribcage sits on the back. This is the starting point - sensing the relationship between arms and torso.
Slowly raise one arm toward the ceiling, but instead of thinking about lifting the arm, think about the ribcage supporting the movement. Can you feel how the shoulder blade moves on your back as the arm moves? The shoulder blade should glide smoothly over the ribcage, not get stuck or create tension.
Now here's where it gets interesting. You can be incredibly precise about what initiates the arm movement. Stand up and try this:
Moving from the clavicle (collarbone): Bring your attention to your collarbone. Imagine the movement starting from this thin bone that connects your shoulder to your sternum. Let the clavicle initiate - it can lift, lower, move forward or back. Notice how this creates a different quality in your arm movement. It feels lighter, almost floating.
Moving from the shoulder blade: Now bring attention to your shoulder blade on your back. Imagine the shoulder blade as a hand sliding over a balloon (your ribcage). Let the shoulder blade glide first - maybe sliding down your back, or wrapping around your side - and let your arm follow that movement. This creates more power and connection to your center.
Moving from the top of the humerus (the ball of the shoulder joint): Finally, bring attention to the head of your upper arm bone where it sits in the shoulder socket. Imagine this ball rolling in its socket, exploring the full range of movement. This creates the most direct, articulated quality of movement.
Try the same arm gesture - say, reaching forward - but initiate it from each of these three places. From the clavicle. From the shoulder blade. From the head of the humerus. Notice how different each one feels. This is the level of precision you can access when you understand your anatomy through felt experience.
Insight 7: Breath as Movement
Breath is the bridge between voluntary and involuntary movement. It happens automatically, but you can also consciously control it. This makes it uniquely powerful for influencing how you move.

The diaphragm is a dome-shaped muscle that separates the thoracic cavity (heart and lungs) from the abdominal cavity (digestive organs). When you breathe in, the diaphragm contracts and descends, creating a vacuum that pulls air into the lungs. When you breathe out, it relaxes and rises, pushing air out.
But here's what most people don't realize: the diaphragm's movement affects everything around it. When it descends, it gently massages the organs below it. The liver, stomach, and intestines all receive this rhythmic compression. When the diaphragm rises, these organs have more space to expand.
This means that breath, properly understood, is a whole-body movement. Every inhale creates a gentle expansion throughout the torso. Every exhale creates a gentle softening. You can feel this most clearly if you lie down and place one hand on your belly and one on your chest, then breathe naturally and notice the gentle rising and falling.
For dancers, the key insight is this: breath can either support or interfere with movement. When I hold my breath (which I used to do unconsciously when concentrating or making big movements), my whole body becomes more rigid. But when I let breath flow continuously, movement becomes more fluid and sustainable.
The practical application: don't try to control your breathing according to some ideal pattern. Instead, just make sure you're actually breathing. Many dancers unconsciously hold their breath during challenging movements. Simply noticing this and allowing breath to continue creates an immediate improvement in movement quality.